[GUIDE] How to make your own Cabal Theme
 I assumed that everyone here know already how to apply Cabal Online customized skins since FortRuinaManager made a guide about it in Cabal Online PH Official Forums. If you are reading this and yet don't know how to apply customized skins in your Cabal, you might spend a couple of minutes reading it here first.
So, everything's done. You are ready to change your Cabal Online theme but you don't have a theme to replace your old one with. You try searching the net but luck seem to elapsed you. You spend a little more time holding on your temper just to get the theme that might change your mood. And poof! You bump into a website that huge amount of Cabal themes can be downloaded. Your excitement is overflowing, with too much haste, you click on the download button so excitedly. Then after downloading, you unzipped it but WTF!OMG!AFK!BRB! You don't like it actually. The file that you have just downloaded is really really nothing but just a bunch of FU$%^&*() crap that makes you think that you are the most unlucky person in the world...
Well you aren't really that unlucky if you bump in my blog.
This is all about making your own Cabal Online theme so instead of spending more time on the internet looking for crap themes you are now spending your time in Photoshop or GIMP or whatever photo editing software you like the most.
Let's get started.
TOOLS YOU NEED:
If you're a Photoshop guy, then there's no need to worry about downloading any other photo-editing software that is available on the net. You just have to download the following files.
1. Adobe Photoshop - Any version will do. In case you dun have it yet which is kinda impossible (LOL)
2. NVIDIA DDS Plugin for Photoshop - You have to install this plugin for you to be able to open DDS files (Files in Cabal Online theme are saved as DDS files).
For those who doesn't know how to use Photoshop, I recommend using the following:
1. GIMP 2.6.2 - Easy to use image editing software.
2. DDS Plugin for GIMP - Install this file so you can open DDS files in your GIMP application.
Or you might want to try the alternative:
1. Paint.Net 3.36 - Another image editing software.
2. DDS Plugin for Paint.Net - This file will allow you to open DDS files in your Paint.Net
Click here for the instructions on installing this plugin.
Optional Tools:
1. Windows Texture Viewer - So that you'll be able to view DDS files without opening Photoshop.
2. DDS thumbnail viewer - Use this file to view thumbnails of DDS files.
Now you have all the tools. It's time for us to begin. Since I know a little in Photoshop, We'll be using Photoshop CS4 Extended in this tutorial.
Things you need to know:
Cabal Online Theme files were saved in the folder named Theme1 which can be found in:
For 32-bit xp users:
X:\Program Files\e-Games\CABAL Online (PH)\DATA\UI\Theme1
For 64-bit xp users:
x:\Program Files (x86)\e-Games\CABAL Online (PH)\DATA\UI\Theme1
were x is the drive letter where your Cabal Online PH was saved.
STEPS:
Make sure to backup all the original Cabal Online PH theme files so when everything is messed up, there is no need for you to worry.
To make a backup:
Navigate to X:\Program Files\e-Games\CABAL Online (PH)\DATA\UI\
again, x is the letter of your drive where Cabal Online PH was installed.
Right click on the Theme1 folder > choose copy 
Open My Documents > right click in an empty area > choose paste.
Rename that folder into Theme1_backup
then make another copy and rename it as Theme1_project
At this point there should be something like this in your My Documents folder:
Theme1_backup - This is your backup file
Theme1_project - This is where you saved your theme before replacing the actual cabal theme files.
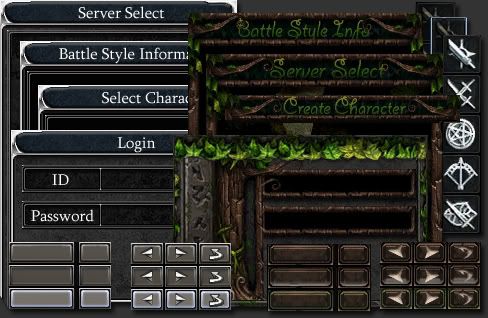
Since we will be editing the Select Server screen the original DDS file which we are going to open is the UI_Texture4.dds because it is where select server is located.
Navigate in your Theme1_project folder then open UI_Texture4.dds
Tip: Tick on the check box that says Always use the selected program to open this kind of file
So, you everytime you open DDS files you just have to double click on it.

Tip: Zoom it out to about 1200% so you can clearly see each pixel.

Press ctrl+j to duplicate that part of the layer. Rename it to Server Select

Make a new layer between your Background and the Server Select layer you created.
To do this: Click on the background layer then click on create new layer. Rename it to Black Background
Tip: Make sure to click the background first before clicking the create new layer, in this way you are sure enough that the new layer you created will appear just above the background layer and below the select server layer.

Use the Paint bucket tool to fill that layer with black.

Now everything should turn black aside from the select server this is to make sure that you won't mess up the other part on the file and that you won't be bothered by any other images.

You can now do whatever you want with that Server Select server layer. In my case I replace that layer with this one:
 When everything is in the right place, turn off the visibility of the old server select and the black background layers. Click on the eye icon to turn off the visibility.
Now you're done! Save it as UI_Texture4.dds
Paste it in your Cabal Online theme folder. If in case you forgot where it is, you might want to scroll upward way up to the first part of this tutorial.
If you're asked wether to replace the old one, click YES
 Now it's time to check if it really works. Restart your Cabal Online PH to take effect.
This is what is looks like in-game:

In my case I changed this entire page:
 into this:
So i have the following in-game skin:
My login screen:

Select Server screen:

Character Select screen:

Create Character screen:

I'm not done with this theme, I am still fixing some glitches T___T If you like this tutorial or my skin please feel free to leave a comment or give me a backlink.
Thanks!


Wow! galing naman!
loved your tutorial man, but is there a way i could create a seamless or transparent object like buttons???